Thursday, April 30, 2015

A Round Robin (almost) Finish!!

I've been looking forward to sharing the results of this round robin group for several weeks now.  It all started last fall when 5 of us (Carol, Kathy, Allison, Julianne, and myself) joined together with Bea at Beaquilter to begin a round robin adventure that Bea organized.  The parameters were based on the size of each "round".  Everyone began with a 12" block and this free form Bug Hut was my starting point.  I wrote about how I created it HERE.
 
At the end of October, it went into the wild unknown to visit the other five gals!
I added the first border around Kathy's bear -- my first reaction when I opened her package was "oh, my" -- the imaginative color selection startled me at first but very quickly I decided to surround it with 3" bear paw blocks and shared some of what I was doing in November (HERE).  At this point, I don't know if I didn't take a picture of it with the border or if I just can't find it, but you'll see it in her post.
No sooner had I sent the bear off to the next stop than Julianne's piece arrived.  Wow, look at all this color!!  My addition is the scrappy 8-pointed stars -- it was easy to get them perfect using Marti Michell's Set E templates for 12" and 6" stars!!
Allison's birthday cake arrived next -- her inspiration was a significant birthday.  I searched around for compatible birthday party treats -- ice cream cones, poppers, candles and finally settled on cupcakes!!  And since I didn't want her to overindulge in cake, I added some complementary 9-patchs and fussy cut squares from a cheerful print in my stash! 
Everyone got really stoked up around the beginning of the year and at one point I had two of the traveling packages in my studio at the same time.  No pressure?!?  Bea's patriotic theme arrived about the same time a new tool arrived from Marti Michell -- the Peaky and Spike Multi-size Ruler.  So I tried it out and shared my experience HERE without revealing the true purpose of the blocks I made.
 I had quite a time deciding whether to hang the "pendants" down or up across the top but in the end you can see I went for down.
Last but not least was Carol's piece.  It is so colorful and I think I heard something about it becoming a picnic quilt?  I probably did the most auditioning with this one for both a block and color.  I chose the simple square in a square blocks and repeated the blue to keep the focus on the center of the piece. 
While I worked on Carol's piece, my piece arrived -- it returned home 3 weeks early and I decided not to open it until I had finished Carol's and sent it off. 
 
When I opened my box, I was stunned!!  
Wow, wow, wow!!!
I've spent the past month adding rick-rack and appliqueing down more bugs.
It's layered up, but as I was doing that I started waffling about machine quilting it or doing "big stitch" hand quilting with pearle cotton.   
This paper-pieced bee block has been on my "to-do" list for months so I was thrilled to find it included in my quilt, not just once, but four times!!  Thanks Kathy for crossing that off my list for me!!
 I had lots of fun adding the rick-rack even though it is totally not my style to embellish at all!! 
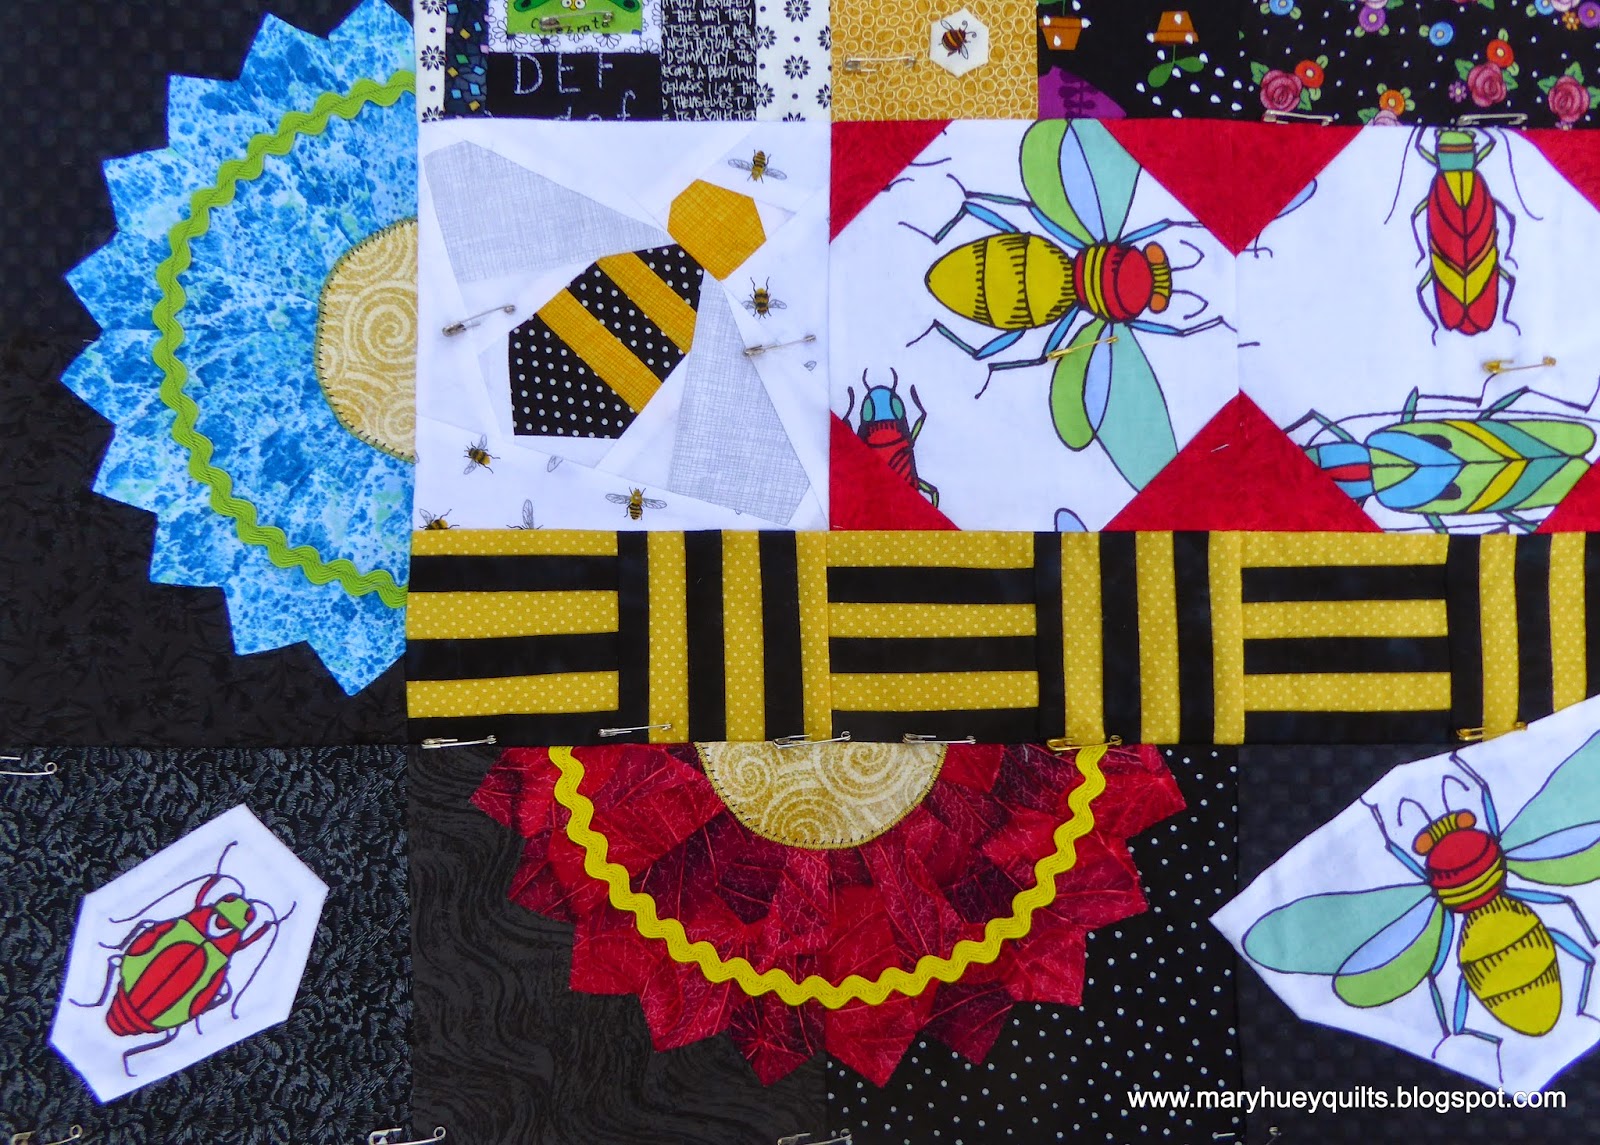
I found a sweet little bee fabric in my stash and made a dozen 3/4" hexagons which are spotted all over the piece -- I may add a few more while I decide about the quilting process. 
The backing has a label to remember all the quilters who shared their talents and inspiration with me!   This quilt will hang in my bedroom I think -- it's such a cheerful piece to contemplate!!
Bea is recruiting for another group -- the details and links to the other gals finished pieces are at her blog HERE.   It was fun and if you've never participated in a round robin, I encourage you to think about joining.  It will challenge you to go places you didn't know you could go!!
 
Mary Huey


Friday, April 17, 2015

The Next Step -- Courthouse Steps!

All the new step samples for teaching Courthouse Stars are zipped and labeled -- ready to go!!
I'm so pleased with the way the sample blocks look, it's going to be hard not to finish this up in a hurry!!
The little stars grow up to be big stars!
I like the yellow with the pink, but not so sure about the orange?  What do you think?
The big stars look a little wonky because I have not actually stitched them together but couldn't wait to lay them out and set how they look.
Just a quick audition of the blocks.  So far, so good!
If you'd like to make your own version, you can order the pattern from my website -- HERE.  It uses Marti Michell's 1 1/4" log cabin ruler and the Lazy Girl 4XFlying Geese Tool.
 
Maybe next week I'll share pictures of a finished quilt top?!?!
 
Have a good weekend of stitching!!
 
Mary Huey


Tuesday, April 14, 2015

Two Birds -- One Stone?

Not that I would actually throw a stone at a bird -- after all, birding is how I spend a good part of my non-quilting time! 
 
For those of you who don't take on more than you can handle, today's musings may not be helpful.  But if you are like me and take on most of the opportunities that come your way, this strategy might be useful.
 
This year, I'm making an effort to tidy up and thin down this palette of fabric one month at a time, one shelf at a time.   
For the month of April it's the black shelf's turn.  At the same time, I'm making a twin size charity quilt to thin it down and use up about 10 yards of that color. 
 (So far I'm three for three!!!)
A touch of black in a quilt adds sparkle and drama to a print or a quilt and so I've hoarded the best of the best for years.  What I've noticed though is that I use it in rather small quantities so it has really piled up.
The shelf is now tidy -- that's good!!  But what about the quilt?
 
I need to make new steps samples for my workshop later this week in Florence, Kentucky for the Stringtown Quilt Guild.  They have invited me to teach my pattern, Courthouse Stars.  It was the last mystery quilt I wrote for my shop back in 2005 and has been a steadily popular seller for me since then. 
This is my first version of the quilt which I quilted in four sections -- it's done now but when the group got together for the show and tell that summer, it was still in pieces.
 
So over the weekend, I began my new teaching sample for Courthouse Stars from the black shelf in the twin size and it will eventually become a charity quilt.!!  The floral has a black background so it was allowed to live on that shelf.  I've cut up some of it for the centers of the stars and courthouse steps blocks which will be blacks and whites.  There are stacks of strips ready to use in demos for the log cabin cutting and piecing.  And this afternoon, I'll piece a few blocks.
Still not sure what the accent color (the green in my first one) will be, but right now I'm thinking polka dots!!!  Need to audition that idea.
 
So my strategy as often as possible is to merge several goals/needs into one project.  I'll have a new set of teaching samples, the black shelf is thinned and tidy, and eventually there will be a lovely charity quilt to share with someone!
 
Two birds, one stone!!
 
How do you manage your overzealous ambitions?
 
Have you discovered #sewmystash2015 on Instagram and http://www.projectleasa.com/category/sewmystash2015/?  There are great ideas popping up over there as dozens of sewists share how they are sewing through their stashes in 2015!
 
Mary Huey


Thursday, April 9, 2015

Trying Again!?! 2nd Quarter Finishing Goals!

As someone said to me last week, if we don't set goals, nothing gets done.
 I managed to avoid most of my "announced" goals during the first quarter of 2015, but I'm back to give it another try!!  Adrianne at On the Windy Side is combing through 549 finishes for the first quarter -- wow, that's a lot of finishing!!
I balk when it comes to "quilting" a top -- can't think what to do and just freeze up -- having a concrete deadline will break the freeze but just wanting to finish something isn't enough incentive as I proved during the past 3 months.   So I'm rolling over the two UFO's from last quarter to the top of this quarter's list and feeling very confident!!
The teacup quilt is about half quilted already and the "design" freeze is over.
The polka dot sampler is layered up and that's a good first step.
To that I'm adding the following.
I want to finish hand quilting a Baltimore Album sampler for my younger daughter.  I appliqued the blocks over 20 years ago and finally set them together a couple years ago.  There are 9 blocks and last fall I did get 3 of the blocks quilted -- then I got distracted by EPP and knitting during my daily hand stitching hour.  Too nice not to finish so back to it!!
Making the name pillows for Easter gave me the idea of making some "letter" pillow covers for my summer living room (the front porch).  And just for fun, I'm going to use my stash of fruit and veggie prints so they will go with the quilt I finished in February.  And while I've got that stack out, I'm going to make a set of 8 Fat Quarter Placemats for summer patio suppers!!  
I'm going to finish the "sunflower" quilt I started in January as part of Nathalie's "not a mystery" follow-along -- visit her blog HERE -- yes, it's in French but just tell your computer to translate it!!  It uses Marti Michell's 2" Kite and Crown template set and I'd like to offer it as a workshop during the summer, so a charming finished sample is needed!!
I participated in a round robin with 5 other gals during the winter -- I wrote about my starting block HERE!  It's back home and I'm sprucing it up with rickrack and more bugs for a mid-April group reveal.  It won't be completely finished by then but I'd like to be able to hang it during the summer, so I'm adding it to the list, too. 
(Check back next week for a full look at this quilt -- it is so stinking cute!!)
Finally, I have been making a charity quilt top each month to "sew my stash" -- i.e., thin it out a bit.
We make a donation of a dozen quilts mid-summer to a local mission team that participates annually in the Appalachia Service Project.  So the March quilt (about 9 yards off the green shelf) is going with them!!  It's layered up and ready to encounter me and George (my APQS quilting machine).  I'm doing it in two sections (ala Marti Michell's book, Machine Quilting in Sections).
It feels ambitious especially with spring birding (it's spring migration you know) and gardening starting to gear up in my life, but I'll get some of it done if not all of it and that will be more than might have happened otherwise!!

Are you making a list?

I'm headed over to On the Windy Side and see what everyone else is putting on their "to-finish" lists!!  Mine will be list #68?!?

Mary Huey


Monday, April 6, 2015

Antique Rose Star

Have you discovered the Antique Rose Star block?  I give credit to an Australian quiltmaker, Sarah Fielke, for bringing this block to my attention in the book Material Obsession II.  Her "English paper pieced" renderings are so exciting -- I do some EPP but my forte is really machine piecing.
 
 
Happily, just about the time I discovered the block, Marti Michell released two template sets with the shapes needed to rotary cut and machine piece this design -- the Kite and Crown!! 
 
 
A few days ago I stumbled into a wonderful page full of Antique Rose Star blocks on Flickr -- there are over 500 photos shared in a group that was organized a couple years ago.  I'm not sure I can handle that much inspiration!!
https://www.flickr.com/groups/rosestarblockparty/

The students in the first two workshops I taught had the same reaction to their success -- "this is so much easier than I thought it would be!!"  We are often intimidated by blocks that have lots of pieces but this is one of those instances where we should not be!!

Didn't Susan do a wonderful job of fuzzy cutting here pieces?
Actually the most challenging part of making this block for me is choosing the fabrics. It might be because there are so many positioning options.  A student in one workshop decided to cut six kites and six crowns from every fabric she was considering and then play.  What a great strategy!!

Dianne's happy version generated enough pieces for two more stars?!?
I think this is my new favorite workshop to teach -- not only is it a great pattern to introduce quilters to Set-In Piecing Simplified technique but I love it when everyone has a good time and leaves excited about what they are doing.  So there are two more coming up soon. 
 
Friday, May 1, 2015 from 10 a.m. to 3 p.m. at Cottonpicker's in Chardon, Ohio
Call 440-279-0610 to register and get the supply list.
 
Friday, May 8, 2015 from 9:30 to 3:30 at The Sew'n Place in their new location in Fayetteville, PA
Call 717-352-3050 to register and get the supply list.
 
Don't live near either of those places?  Sorry I would love to meet you but I just posted a special on my website so you can learn this terrific technique for chain piecing through set-in seams -- order my DVD workshop and one of the Kite & Crown sets and I'll give you FREE shipping -- offer good only through 4/15/2015 and USA shipping!
 
Have a pieceful day!
Mary Huey


Wednesday, April 1, 2015

Pillow Talk -- Not just for Lovers!!

Just before Christmas, I had a note from Sherry over at Sherry Quilts.  She had used my Alphabet pattern to make a half dozen pillows for her favorite kids!  I was thrilled.  When I wrote the pattern back in the 1980's I didn't intend for quilters to make the sampler like the pattern photo -- I thought they would use the letters as "banners" within their quilts -- well, that's how I've always used them. 
http://www.maryhueyquilts.com/catalog/i10.html
I asked Sherry for permission to share her idea and I used it this week to make a couple Easter treats for my grands!  The pattern has a chart of all 26 letters of the alphabet plus the number 0 through 9 in four sizes -- 3 3/4" tall, 5" tall, 6 1/4" tall and 7 1/2" tall.  It uses squares and rectangles plus snowball corners so there are no templates -- everything can be rotary cut!
 
I purchased two small pillow forms -- a tube and a rectangle.  I settled on fabrics from "the most awesome" stash of fabric in the world and cut everything for GRACE to begin.
At the sewing machine, I laid out each letter -- this is a "C". 
I had all five letters together in under an hour.
The spacers between the letters make them look so much better!
I chose a fat quarter of a Riley Blake print from a stack I've been hoarding.
I've never covered a tubular pillow form so I had to stop and do some research.  I found this VIDEO from Sailrite.  It is a decorator approach and I simplified my approach a bit but watching the video helped me gather my thoughts.  This is what I came up with for my pillow.
I made a wide "casing" for each end to get a gathered finish.  Once I determined how long the main part needed to be, I cut two bands -- one for each end of the cover.  The width of these bands is the diameter of the end of the pillow form. 
I folded each casing piece in half bringing the short ends together, right sides facing and stitched a seam leaving a 1/2" opening to one side of the center.  The pencil mark by my finger is the center. 
Once I pressed the seams open, these become the openings for casings that I threaded ribbon through. 
Now I folded each casing in half, wrong sides together and you can see that the opening is right by this folded edge. 
I also stitched the short ends of the pillow cover body together so I have a tube.  Now I inserted each casing in one end of the pillow tube (which is turned wrong side out), matching the raw edges and pinning everything in place. 
The opening in the casing needs to be against the right side of the pillow cover at this point -- that keeps the opening on the outside of the finished cover.
Once I had stitched the seams on my sewing machine, I clean finished the edges with my serger to eliminate raveling. 
Once the casings were attached, I turned the entire cover right side out and pressed the seams and edges. 
I plunged into the ribbon stash and found a reel of 1/4" pink satin ribbon -- yea!!  I don't have to leave the house!! 
Once I knew the width of the ribbon, I stitched along the folded edge of the casing to make a channel to thread the ribbon through.
I found my Purple Thang (another yea!!) and threaded the ribbon through each casing.  Time to insert the pillow form!!
But first, I must break the law (-; and cut off the tag!!  LOL!!!
And into the cover the form begins to go!
I drew up the ribbon and IT WORKED!!
There's one for Ben, too.   I used the 5" tall letters for his rectangular pillow and the 3 3/4" ones for Grace's small bolster. 
That's the last of this fishing flies fabric -- Ben is showing signs of enjoying fishing and I think he'll like this "guy" fabric. 
I'm so grateful to Sherry for sharing her idea with me.  As I was posing the finished pillows on the patio chair, I decided to recover my little porch pillows for summer with some of the letters and my fruit and veggie prints -- K is for kale, B is for banana . . .
 
The pattern is available on my website -- HERE -- and for the rest of April, I'll offer FREE shipping when you order your own copy!!
 
Mary Huey